
- Create a Bootable ISO/CD Setup Windows XP with nLite
- How to Make Unattended Setup of Windows XP with nLite
- Integrate Driver into Windows XP setup with nLite
- Integrating the Service Pack to Windows XP setup with nLite
- Integrating Windows XP Hotfix to setup with nLite

By creating an unattended setup of Windows XP, you no longer need to wait for the installation of Windows XP to answer some questions that arise in the setup wizard. So when the setup is already running, you can leave and return to the computer after the installation process is complete.
How to create unattended setup of Windows XP, almost the same as the previous explanation of nLite. Here's how to create unattended setup of Windows XP with nLite:


How to create unattended setup of Windows XP, almost the same as the previous explanation of nLite. Here's how to create unattended setup of Windows XP with nLite:
- As usual, the first advance copy of Windows XP setup into a folder on the hard disk. If you've done some previous nLite tutorial, you can skip this step.
- Open the program nLite and click Next on the first window.
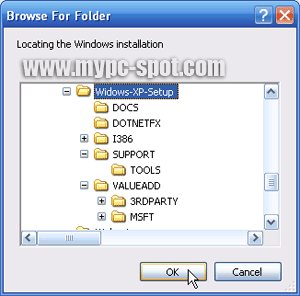
- Next click the Browse button to locate the folder Windows XP Setup

- Furthermore, in the Browse For Folder window, select the Windows XP setup folder that has been copied to the hard disk. If you had done the previous tutorial, you can use these setup. Wait until the scanning process is completed by nLite. Click Next to continue.
- In the Import Preset window, just skip this step by clicking Next.
- Then, select the Unattended Setup in the next window and click Next.
- Next, you will enter the stage of charging options unattended. In this window, you must complete several inputs that will be an answer to the question that usually appear on the Windows XP installation process. Here are some important things that must be completed for the Windows XP installation process will run smoothly:
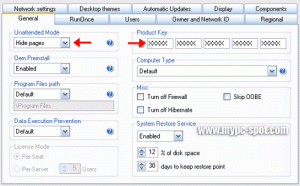
First click the General tab. On this tab, select the Hide Pages in unattended mode option. Then the contents of the Windows XP product key in the input Product Key. Do not samapai wrong in entering the product key. If false, the Windows XP setup may fail.

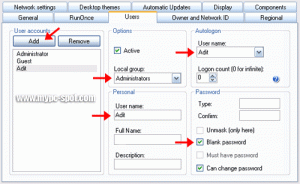
After completing the input on the General tab, click the Users tab. On this tab you can create a user account that later would you use to log into Windows. For that click the Add button. Enter your desired username in the input username, password to the password input. Input this password is optional. You can give your password and can not by checking the Blank Password option.

Do not forget to select your account type, whether administrator or not by selecting the option Local Group. Then click the Add button. If you wish to have your account is automatically logged in when finished installing Windows, select your username in the options Autologon.
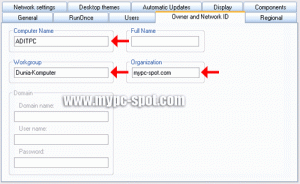
If all the necessary inputs on the Users tab you've finished the contents, click the Owner tab and the Network ID. Enter the computer name in the Computer Name, the name of the workgroup in Workgroup (opsional. If later you are connected to a LAN network, enter the LAN workgroup name), name of organization in the Organization (optional).

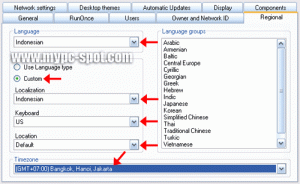
Once completed the Owner and Network ID tab, click the Regional tab. On this tab is complete a few required options. Select the language you want to use the Language option. At the bottom, mark the Custom option. Then choose Indonesian(example) on Localization, U.S. on Keyboard option, default in the Location, and select your time zone on Timezone.

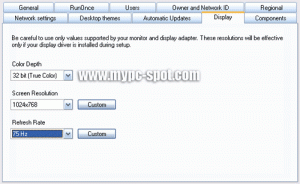
The last one, click the Display tab. Select the appropriate color depth on the Color Depth, screen resolution on the Resolution, and Refresh Rate. Adjust the setting was third with VGA and capabilities of your monitor.

If the five settings you had been completed, time to move on to the next stage of the process of integration into the Windows XP setup. However, previously it would need to double check your settings fifth was to minimize the occurrence of errors. If all you taste is fine, click Next to continue.
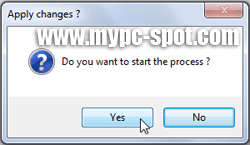
- If it appears a message that says Do You Want start the process? click Yes to start the process.

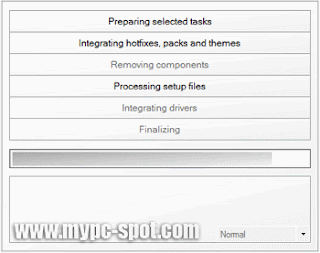
- The integration process will begin and drivers wait until the process is complete.

- If the process is complete, click Next and finally click Finish.Good luck!
Hopefully useful for friend all. If there are not clear please ask via the comments box below.
Mudah-mudahan bermanfaat buat Sobat semua. Kalo ada yang kurang jelas silahkan tanyakan melalui kotak komentar dibawah.
Mudah-mudahan bermanfaat buat Sobat semua. Kalo ada yang kurang jelas silahkan tanyakan melalui kotak komentar dibawah.
- How to Make Unattended Setup of Windows XP with nLite
- 5.0 out of 10 based on 745 user ratings
- 15
- Software, Tutorial

Posting Komentar